https://www.youtube.com/watch?v=J_6jF7Fpezk
HOW TO DRAW AN EYE FOR BEGINNERS [_EASY TUTORIAL_]
Hey guys and welcome back to another video of mine in today's tutorial .
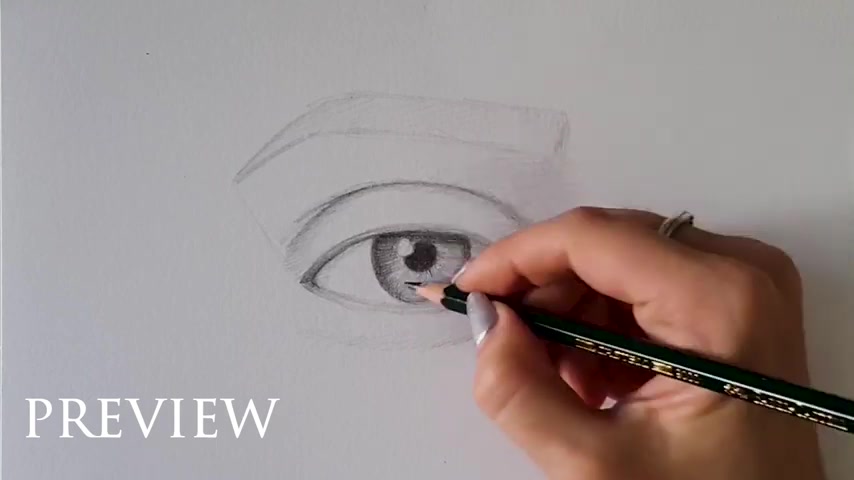
We are going to be drawing an eye and I think that this is the most simplest way on how you can get a good eye drawing .
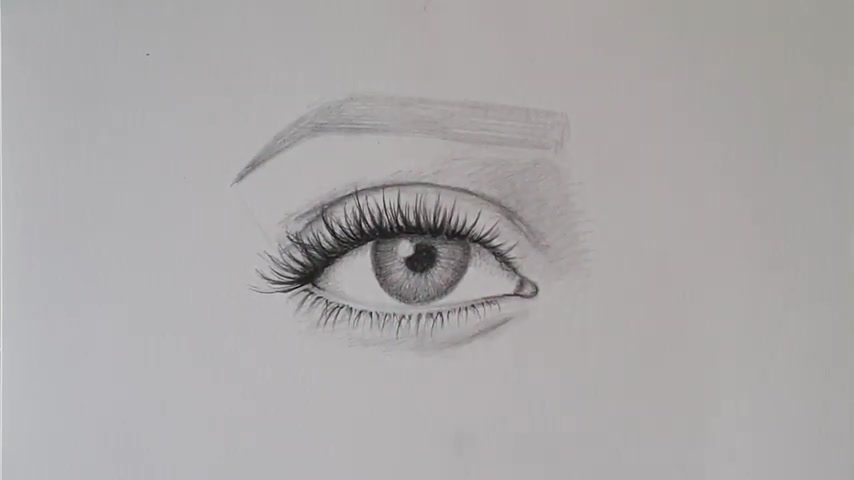
So if you follow this along carefully , by the end of this video , you will be able to draw something like this so we can start with the drawing now .
All right .
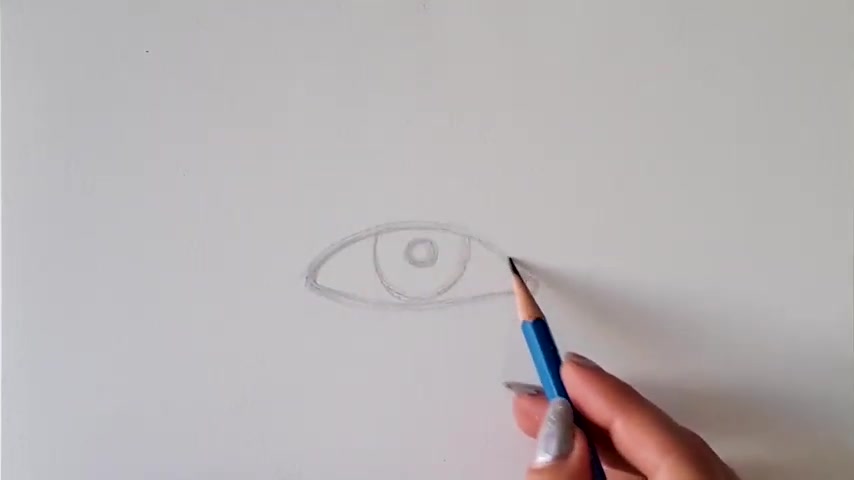
So the first thing to do is to make a circle , it doesn't have to be like 100% an accurate circle , just make a circle as you wish .
And then on the inside part of that circle , you can make a smaller one .
It's usually double size like smaller from the bigger one .
And then on the inside part of that circle , you make another one .
So this is basically the base , this is our iris and the pupil .

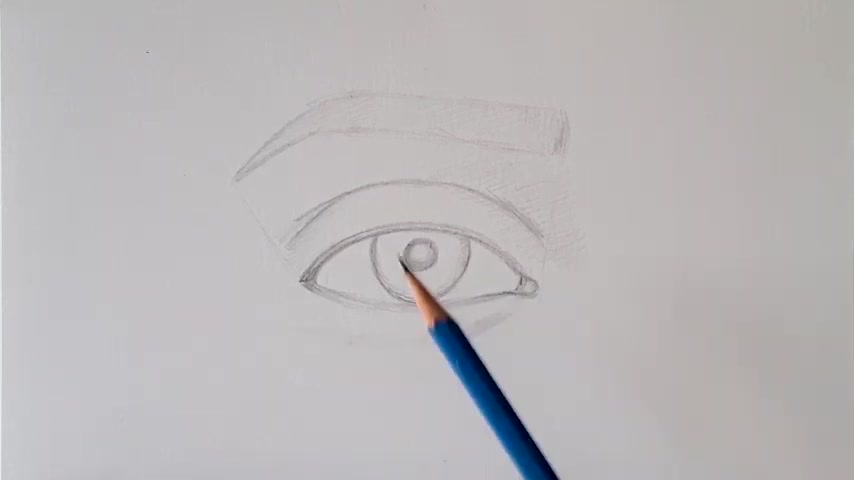
So as for the eyelids , since we're now trying to get a proper eyelids , um the eyelids are usually somewhere , the upper part is as you can see covering just a small part of the iris .
And um unless the person is very like surprised or um scared or anything like that .
It's , it's usually covering like a part of the iris and on the down part , um , of the eyelids , as you can see , it's usually right underneath the iris .
So we are just gonna make our eyelids like that .
And now we got a base of the eye which was like very simple .
Um , and I think it's , it's very simple .
I truly hope that , um , you manage to do this .
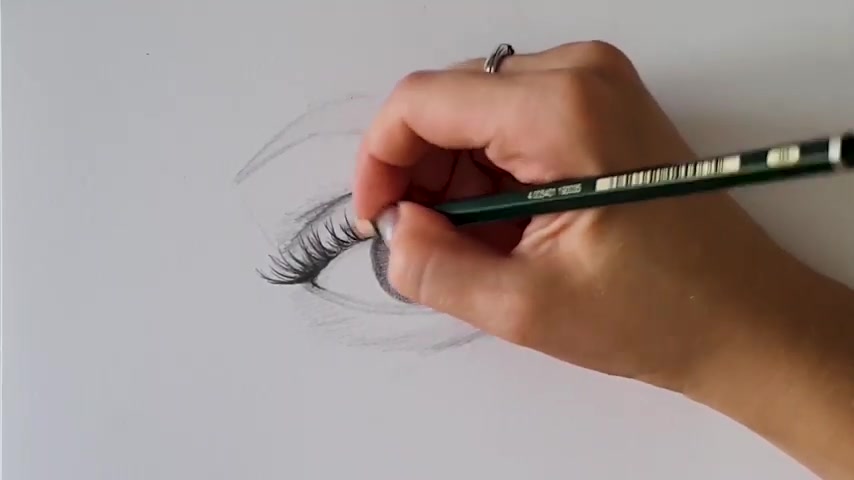
And as you can see now , um , the eyelids , since they are 3D , it's gonna be much easier for you to draw the eyelashes .
If you realize that the eyelids are basically 3d , the they are the ones who are basically protecting our eye .
So if you realize that the eyelids are in 3D and from the eyelids that these are the parts where the eyelashes are gonna go from , um , we need to make that part as 3D .
So it's gonna be much more easier for us to make our eyelashes correct .
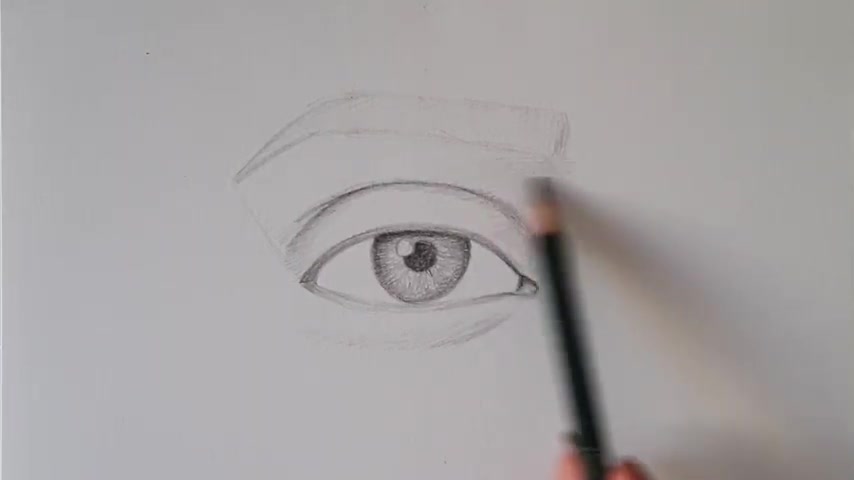
So , at this point , I'm just trying to make the sketch a little bit more accurate .
And as you can see the fold of the eyelids are , you can just put one , half line on the upper part of the eye and then above it , you can make a sketch of the eyebrow like that .
You can just color it in the side on the inside part , you can just shade it , it doesn't have to be like in this tutorial .
We're not using anything like from the um blenders or anything like that .
We're just using the pencils as we go because I just wanted to make this as a usual sketch and I want you to see that even without those help things like the blenders and I don't know the erasers and anything like that , you can still get a proper eye , you can make the pupil dark as you can see And you can also color the iris can also shadow the iris .
So you slowly start building up layer by layer and now I changed it like I was using the F pencil and now I changed it to three B because it's gonna be much easier for me to work on some bases like when it comes to the iris and the pupil .
So you can basically use either two B or three B , even four B .
I think it's very good for this .
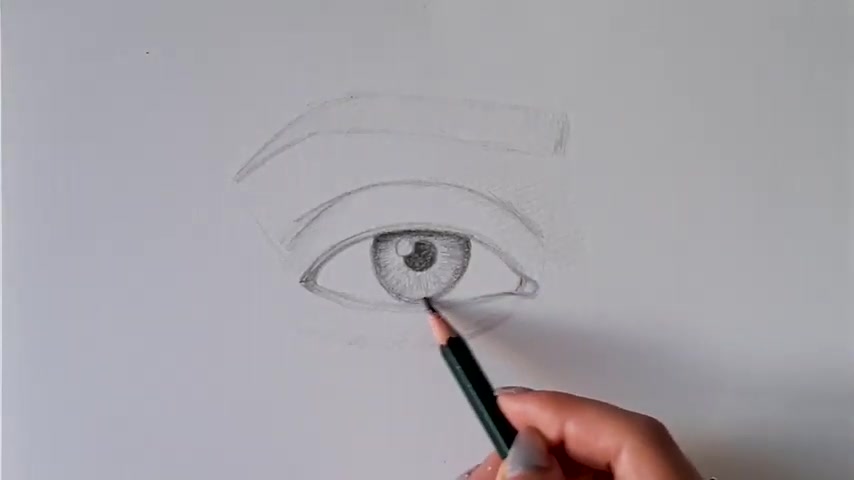
Um I use the F for the sketching and now I'm using the three B so I can basically color the inside part of the iris and the pupil .
And also you can make the upper part of the eyelid a bit darker and the inside part of the eye because from there , that's the part where the our eyelashes are gonna go .
So it's usually um a bit darker and the fold of the eyelids as well is a bit darker .
I'm not going to make it as the like straight , like just the usual line because that is not an actual line .
It is the part where the eyelids are folding .
So basically , that's not an actual line .
So as you can see , I'm trying to , um , shade it a little bit more .
I don't want that to be like just a straight line and that's it .
So make some shading above like between that line .
Um , that fold is gonna look much better if you have a bit shading on the down part .
And on the upper part of that line , you can also shade a bit on the white part of the eye because , um , since we have the eyelids and if we want to make it more 3d , um , since because of our eyelids is going basically um in front of the eye on the upper part of that white part of the eye , it's gonna be a bit more shadowy because um the eyelids are , and of course , the eyelashes are casting the shadow on top of the white part of the eye .
So it's gonna be a bit more shaded .
And as for the pupil , of course , you can make um some more layers inside of the iris and the pupil as well .
You can make a bit more shade .
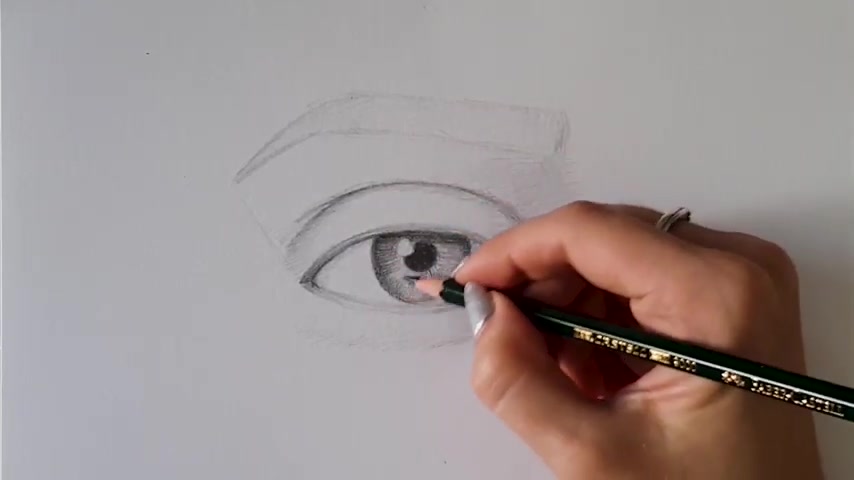
It depends um on the reference photo that you're using , of course , and the color of the actual eye because this is like black and white and we can also manipulate the shades however we want , but I'm just making sure that , um , we got the proper shade and then that we get a bit more contrast when it comes to this , even though this is just a sketch .
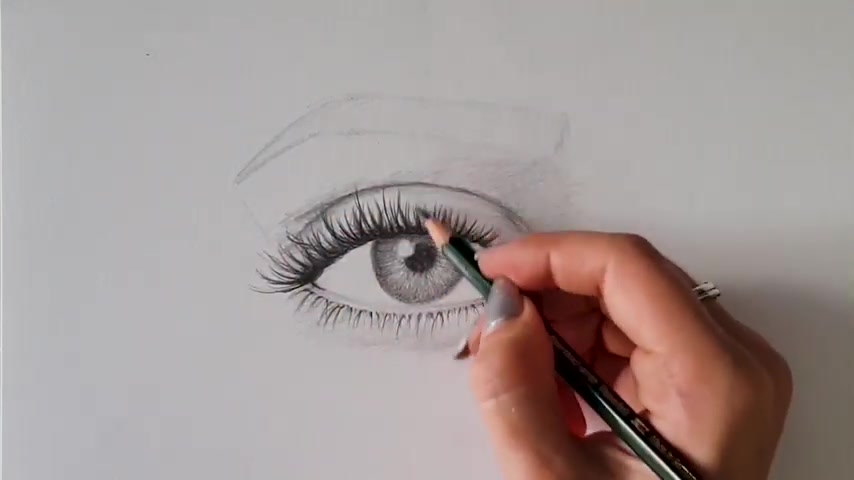
And I'm just putting a bit more shadows on top of the eyelids .
And of course , on the down part of the eye , you can also use a bit more graphite pencils in order to get your eye to look a bit more 3d .
So keep in mind that this is just a practice .
It doesn't have to be like 100% correct .
It doesn't have to be , um , I don't know .
Right .
And 100% accurate , like from the reference photo in this tutorial , you're basically trying to learn a good way on how you can get like the basic form of the eye .
And if you don't make it on your first , like , attempt to draw something like that , don't get discouraged .
Um , I've seen on my tutorial where I did , um , on how to draw , um , the face on how to get good face proportions .
I've seen a couple of comments that people are basically getting discouraged if they don't make it like from the first time .
But don't let this discourage you like my eye like first time that I want to draw .
And I , I was terrible at it and I didn't have absolutely no clue , no idea what I'm doing .
And of course , I felt discouraged but I felt that desire and wish to try and to progress so much more .
So basically , after I think the 50th attempt on actually drawing an eye , I was maybe satisfied a bit more , but it was still far away from the things that I wanted and how I wanted it to look like .
So don't get discouraged if you don't succeed from the first time , try um try another time , try tomorrow , try in the week and you will see like slowly , maybe the 10th time or the 20th time , you will make it and you will be satisfied , but it's important that you don't give up .
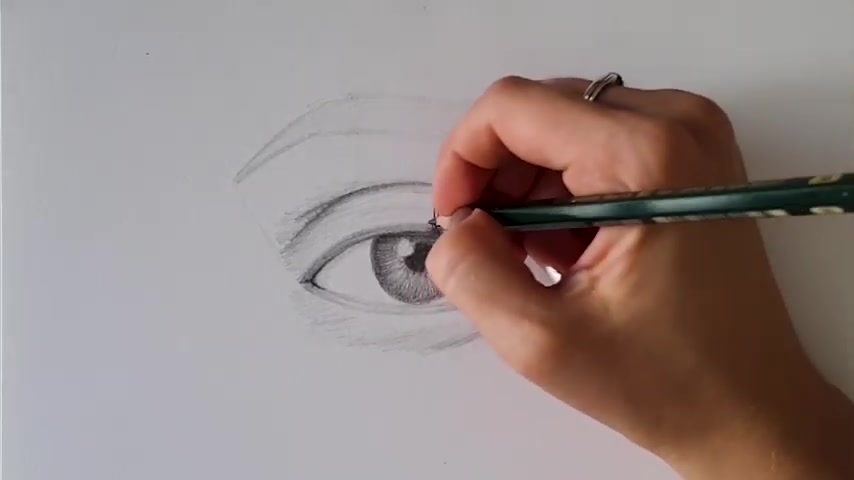
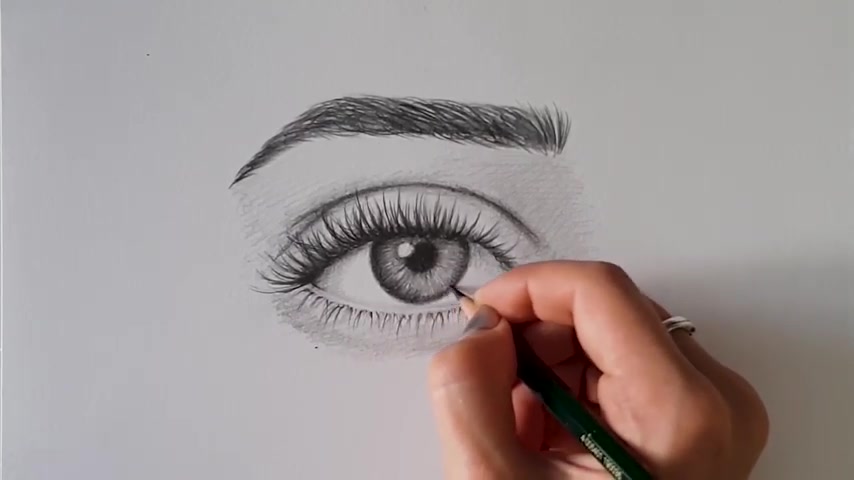
And um yeah , now you can see that I'm basically drawing um the eyelashes and you can see that I'm drawing the eyelashes from the upper part of the eyelid and it's like a lot more easier to draw them because I have that kind of a 3d eyelid .
And from that part , you can basically manipulate the eyelashes to go as you want them to go like in each direction .
And you can feel free to put the eyelashes like on top of the iris because that's how the eyelashes are basically going on top of it .
And don't put the eyelashes onto the same direction , like try to make your eyelashes in a different direction like where the iris is placed .
That's the usual part where the eyelashes are going forward .
And as we go on to the left part , they are going a bit onto the left and as we go on the right part of the eye , it goes a bit more onto the right .
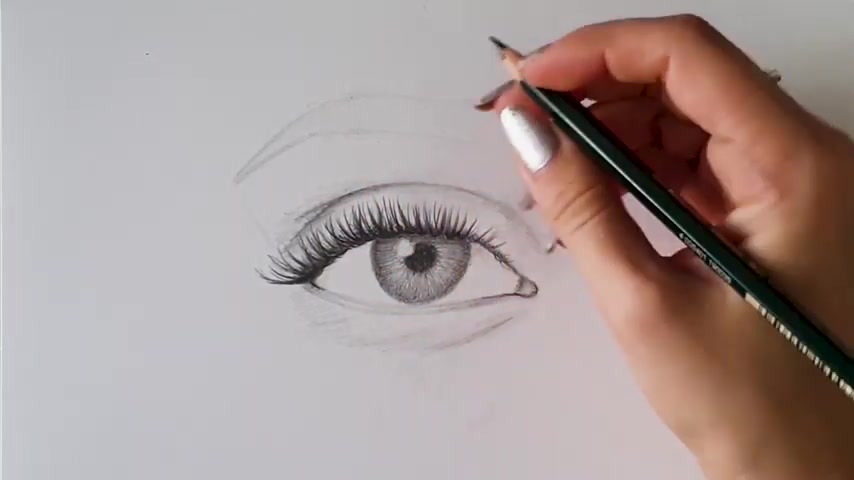
So try to focus a bit more on the direction of where the each eyelash is going and you will see how you will get so much better result because um if you see your eyelashes in the mirror , you can see that they are not going into the same directions , they are not going .
Um each and every one of them is not going on to the right direction or each and every one of them is not going on to the left .
So they're basically going um since the eye is 3d , of course as well and each of the eyelash has its own direction .
So if you try and see your eye um in the mirror and you will see the direction where the eyelashes are going .
So try to do something different because I see a lot of beginners are putting just the eyelashes in the same direction .
So if you try and manipulate a bit more your eyelashes , you will see how better your eye will look like .
And as for the down eyelashes as well , try to make them in a different direction as well .
Like don't put them um each and every one of them onto the left and each and every one of them on to the right , you can see by manipulating them and by putting them each and every one of them into like different direction , you will see how um our eye is looking so much better .
And of course , it depends from the photo , like the reference photo to a reference photo , how your eyelash is gonna is gonna look like like on my reference photo , I have a bit longer eyelashes , but it doesn't have to be the case .
Um you can have a bit smaller eyelashes .
It depends like from the eye to the eye .
Of course , every eye is different , which is like , of course , that's the whole point .
Like it's very amazing to have um none of the eye is the same .
So basically , there are not any formula on how you can get a proper eye drawing because each and every eye , even our eyes like my eye , my left eye is different than from my right eye .
And if you can look yourself into the mirror , you will see that your eyes are different as well .
So each and every like one of the eyes that each and every person has is different so that there's not like the exactly the formula on how you can get um the eyes to look like 100% correct because um as I already told you , like each and every one of them are different , so don't get discouraged if your eye doesn't look like 100% like from the reference photo because it doesn't necessarily have to be , even with small , like your tweaks and your , um , style , you can get your eye to look good and , and proper , even though it doesn't look like 100% like from the reference photo .
So don't get discouraged if you get something different , it's important that you get like base of the anatomy of the eye , like for your eye to look like an actual eye .
And , you know , like you need , basically , I think it has much more to do with um the shading on how your eye is gonna look like .
But it's important to know like kind of the base on how the eye is like the anatomy , the base of the eye , but each and every one of the eye is different .
So it's all depends basically from the shading and it all depends on um how are you going to place the eye and how much um do you know about the anatomy of the eye ?
So I think that you should be more focused on trying to realize how the anatomy of the eye works .
And don't get discouraged if , as I already said , don't get discouraged .
If you get something different than from the reference photo , it's still um something that I'm sure it looks good , it just different and of course , you need to build your own style .
It doesn't have to be um 100% like from the reference photo .
Um I truly hope that you understand everything that I wanted to say .
Um Because um whenever I'm filming this , um voice over , I have a lot of things to say until I switch on my mic and um , then I completely block because as you know , my um mother language is not English and uh sometimes I block .
But anyways , I really hope that you understand me so far .
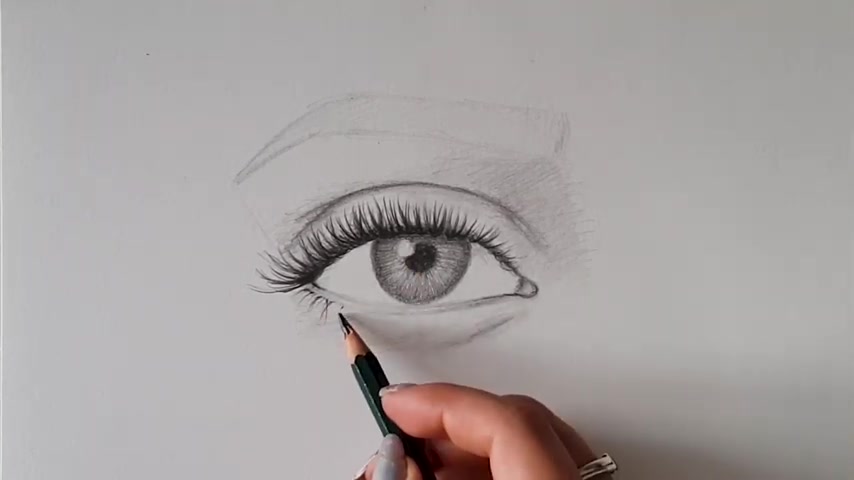
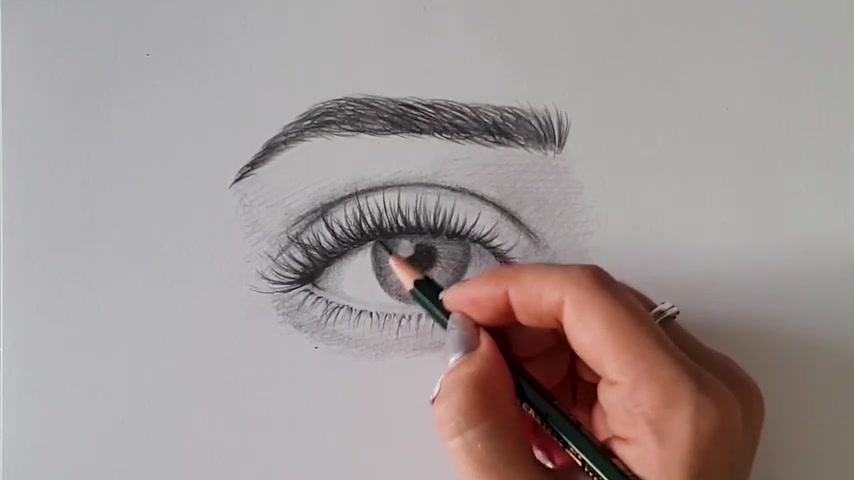
Um I'm still working on the iris a bit more .
I wanted to make um the iris a bit darker and I'm not putting the line between the white part and the iris as you can see , if you look at that transition between the iris and the white part of the eye , you will see that there are not um there are no any like straight and um harsh lines between that .
It's basically um just a transition of the colors .
You don't have that straight line between the iris and the um the white part of the eye .
So don't try and make that line too harsh and too straight because um it's better that you blend it , it's gonna um make your eye like a lot more realistic if you do it like that and if you don't put that um line too harsh .
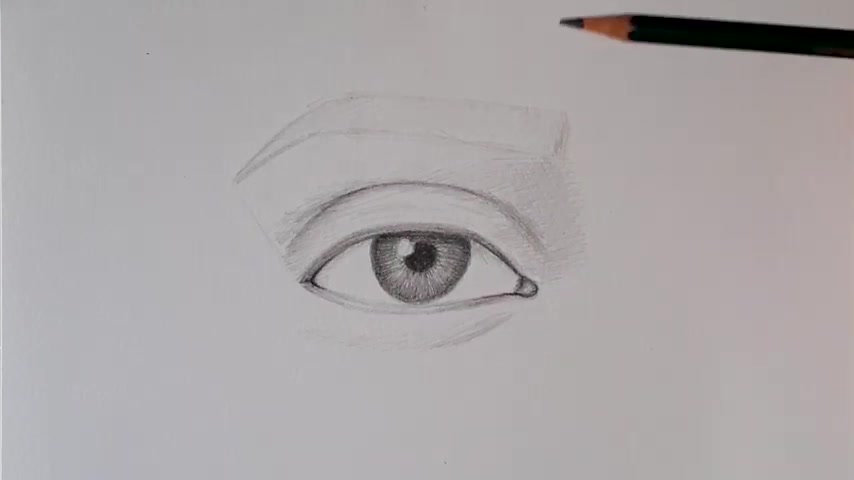
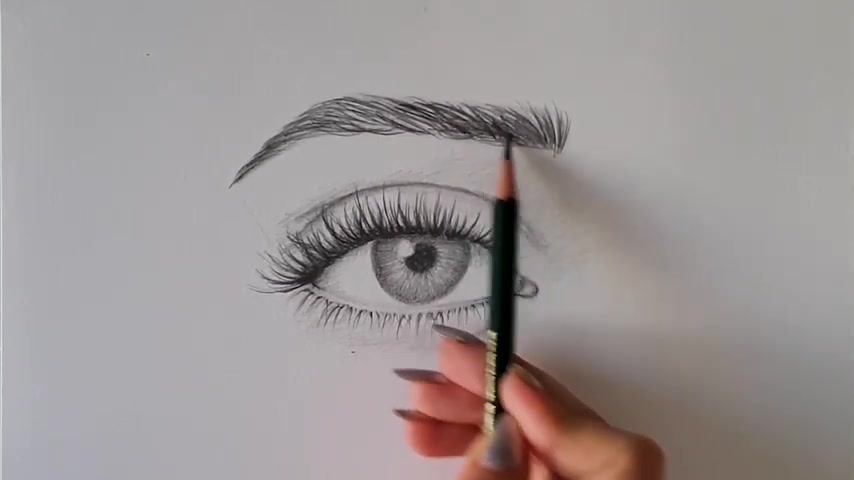
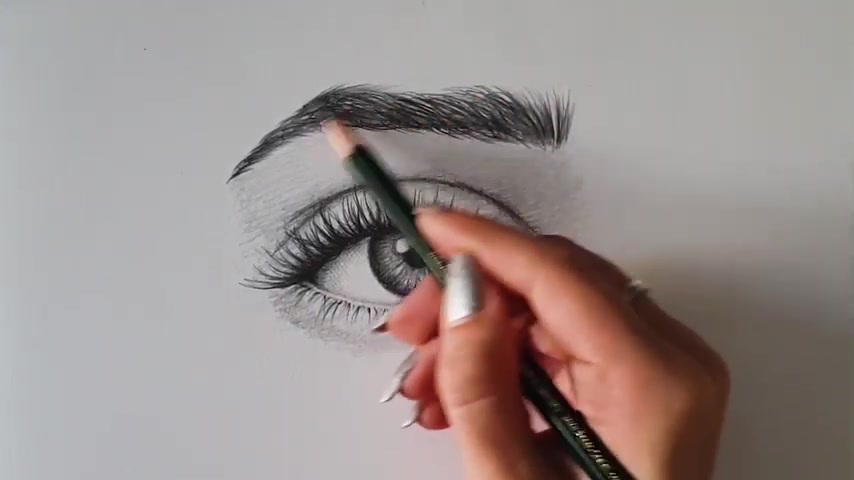
Um So yeah , anyways , I'm just using now my um my graphite to try and build up maybe some um some of the details I'm gonna correct the eyebrow just a bit because I think it's a bit too thin .
So um I'm gonna make my eyebrow a bit thicker as you can see .
And um yeah , that would be all for um today's tutorial guys .
I truly hope that you find this video helpful .
This is like the most basic way on how you can get a good eye drawing .
And I truly hope that you find this video helpful .
Um If you did please give it a thumbs up and um of course , if you haven't subscribed to my channel , I would appreciate that so much .
Um Every support means a lot to me and it inspires me of course to do a lot more of um the videos and everything .
So um yeah , thank you so much .
Please subscribe and like this video and um maybe hit that bell button .
Um So we can get notification whenever I post a new video and I truly hope that you're satisfied with your eye drawing .
And um yeah , I see you all guys in the next video .
Thank you so much and I see you in the next one .
Bye .
Are you looking for a way to reach a wider audience and get more views on your videos?
Our innovative video to text transcribing service can help you do just that.
We provide accurate transcriptions of your videos along with visual content that will help you attract new viewers and keep them engaged. Plus, our data analytics and ad campaign tools can help you monetize your content and maximize your revenue.
Let's partner up and take your video content to the next level!
Contact us today to learn more.